Fork me on GitHub

沙盒实例搭建InnoDB Cluster环境

本文描述了如何通过三个沙盒msyql实例,创建一个Single-Primary Innodb cluster,并通过mysql Router对connections实现路由,实现高可用性。
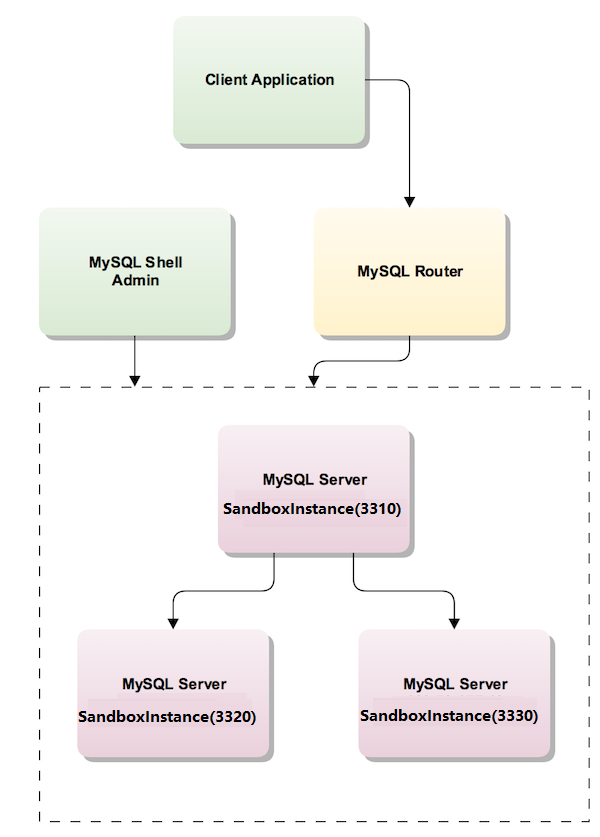
This section explains how to set up a single-primary InnoDB cluster and configure MySQL Router to achieve high availability.

This tutorial shows how to use MySQL Shell to create an InnoDB cluster consisting of a MySQL Server instance which provides the seed instance of the InnoDB cluster and holds the initial data set. Two more sandbox MySQL server instances are created and added to the InnoDB cluster. Then MySQL Router is deployed and used to route connections to the InnoDB cluster, and high availability is tested.

1. Yum 安装MySQL Shell

1
2
3
wget https://dev.mysql.com/get/mysql57-community-release-el7-10.noarch.rpm
rpm -ivh mysql57-community-release-el7-10.noarch.rpm
yum install mysql-shell -y

2. 创建三个沙盒实例

Start MySQL Shell

1
shell> mysqlsh

MySQL Shell provides two scripting languages: JavaScript and Python. Throughout this guide MySQL Shell is used primarily in JavaScript mode . When MySQL Shell starts it is in JavaScript mode by default. You switch into JavaScript mode, Python mode and SQL mode using the commands \js, \py, and \sql. Ensure you are in JavaScript mode by issuing the \js command, then execute:

1
2
3
mysql-js> dba.deploySandboxInstance(3310)
mysql-js> dba.deploySandboxInstance(3320)
mysql-js> dba.deploySandboxInstance(3330)

3. Creating the InnoDB Cluster

Connect MySQL Shell to the seed instance, in this case the one at port 3310:

1
2
3
mysql-js> \connect root@localhost:3310
或者
mysql-js> shell.connect('root@localhost:3310')

Use the createCluster() method to create the InnoDB cluster with the currently connected instance as the seed:

1
mysql-js> var cluster = dba.createCluster('testCluster')

4. Adding Instances to an InnoDB Cluster

配置/etc/hosts

1
127.0.0.1 mysql001

Obtaining the cluster Instance Variable

1
mysql-js> var cluster = dba.getCluster("testCluster")

Add the second instance to the InnoDB cluster:

1
mysql-js> cluster.addInstance('root@localhost:3320')

Add the third instance:

1
mysql-js> cluster.addInstance('root@localhost:3330')

查看cluster 状态

1
2
3
4
5
6
7
8
9
10
11
12
13
14
15
16
17
18
19
20
21
22
23
24
25
26
27
28
29
30
31
32
33
mysql-js> cluster.status()
{
"clusterName": "testCluster",
"defaultReplicaSet": {
"name": "default",
"primary": "localhost:3310",
"status": "OK",
"statusText": "Cluster is ONLINE and can tolerate up to ONE failure.",
"topology": {
"localhost:3310": {
"address": "localhost:3310",
"mode": "R/W",
"readReplicas": {},
"role": "HA",
"status": "ONLINE"
},
"localhost:3320": {
"address": "localhost:3320",
"mode": "R/O",
"readReplicas": {},
"role": "HA",
"status": "ONLINE"
},
"localhost:3330": {
"address": "localhost:3330",
"mode": "R/O",
"readReplicas": {},
"role": "HA",
"status": "ONLINE"
}
}
}
}

5. 安装配置 MySQL Router

Yum安装

1
2
3
wget https://dev.mysql.com/get/mysql57-community-release-el7-10.noarch.rpm
rpm -ivh mysql57-community-release-el7-10.noarch.rpm
yum install mysql-router -y

bootstrap 生成配置文件

1
shell> mysqlrouter --bootstrap root@localhost:3310 --user=mysqlrouter

配置文件/etc/mysqlrouter/mysqlrouter.conf内容

1
2
3
4
5
6
7
8
9
10
11
12
13
14
15
16
17
18
19
20
21
22
23
24
25
26
27
28
29
30
31
32
33
34
35
36
37
38
39
40
41
42
43
44
45
shell > cat /etc/mysqlrouter/mysqlrouter.conf
# File automatically generated during MySQL Router bootstrap
[DEFAULT]
name=system
user=mysqlrouter
keyring_path=/var/lib/mysqlrouter/keyring
master_key_path=/etc/mysqlrouter/mysqlrouter.key
[logger]
level = INFO
[metadata_cache:testCluster]
router_id=3
bootstrap_server_addresses=mysql://localhost:3310,mysql://localhost:3320,mysql://localhost:3330
user=mysql_router3_c3j5z9t7rjgk
metadata_cluster=testCluster
ttl=300
[routing:testCluster_default_rw]
bind_address=0.0.0.0
bind_port=6446
destinations=metadata-cache://testCluster/default?role=PRIMARY
mode=read-write
protocol=classic
[routing:testCluster_default_ro]
bind_address=0.0.0.0
bind_port=6447
destinations=metadata-cache://testCluster/default?role=SECONDARY
mode=read-only
protocol=classic
[routing:testCluster_default_x_rw]
bind_address=0.0.0.0
bind_port=64460
destinations=metadata-cache://testCluster/default?role=PRIMARY
mode=read-write
protocol=x
[routing:testCluster_default_x_ro]
bind_address=0.0.0.0
bind_port=64470
destinations=metadata-cache://testCluster/default?role=SECONDARY
mode=read-only
protocol=x

启动mysqlrouter(记得修改下权限 默认权限不对)

1
2
chown mysqlrouter.mysqlrouter /var/lib/mysqlrouter
systemctl start mysqlrouter

测试连接

1
2
3
4
5
6
7
8
9
10
shell> mysqlsh --uri root@localhost:6446
mysql-js> \sql
Switching to SQL mode... Commands end with ;
mysql-sql> select @@port;
+--------+
| @@port |
+--------+
| 3310 |
+--------+
1 row in set (0.00 sec)

6. Testing Failover

killing the PRIMARY instance 3310

1
mysql-js> dba.killSandboxInstance(3310)

测试连接(第一次失败,第二次成功)

1
2
3
4
5
6
7
8
9
10
11
12
13
14
mysql-js> \sql
Switching to SQL mode... Commands end with ;
mysql-sql> SELECT @@port;
ERROR: 2013 (HY000): Lost connection to MySQL server during query
The global session got disconnected.
Attempting to reconnect to 'root@localhost:6446'...
The global session was successfully reconnected.
mysql-sql> select @@port;
+--------+
| @@port |
+--------+
| 3330 |
+--------+
1 row in set (0.00 sec)

查看cluster状态, 可以发现3320实例已经变成Primary

1
2
3
4
5
6
7
8
9
10
11
12
13
14
15
16
17
18
19
20
21
22
23
24
25
26
27
28
29
30
31
32
33
mysql-js> cluster.status()
{
"clusterName": "testCluster",
"defaultReplicaSet": {
"name": "default",
"primary": "localhost:3320",
"status": "OK_NO_TOLERANCE",
"statusText": "Cluster is NOT tolerant to any failures. 1 member is not active",
"topology": {
"localhost:3310": {
"address": "localhost:3310",
"mode": "R/O",
"readReplicas": {},
"role": "HA",
"status": "(MISSING)"
},
"localhost:3320": {
"address": "localhost:3320",
"mode": "R/W",
"readReplicas": {},
"role": "HA",
"status": "ONLINE"
},
"localhost:3330": {
"address": "localhost:3330",
"mode": "R/O",
"readReplicas": {},
"role": "HA",
"status": "ONLINE"
}
}
}
}

bring the instance that you killed back online.

1
2
3
mysql-js> dba.startSandboxInstance(3310)
mysql-js> cluster.rejoinInstance('root@localhost:3310')
mysql-js> cluster.status()

重新查看cluster状态

1
2
3
4
5
6
7
8
9
10
11
12
13
14
15
16
17
18
19
20
21
22
23
24
25
26
27
28
29
30
31
32
33
mysql-js> cluster.status()
{
"clusterName": "testCluster",
"defaultReplicaSet": {
"name": "default",
"primary": "localhost:3320",
"status": "OK",
"statusText": "Cluster is ONLINE and can tolerate up to ONE failure.",
"topology": {
"localhost:3310": {
"address": "localhost:3310",
"mode": "R/O",
"readReplicas": {},
"role": "HA",
"status": "ONLINE"
},
"localhost:3320": {
"address": "localhost:3320",
"mode": "R/W",
"readReplicas": {},
"role": "HA",
"status": "ONLINE"
},
"localhost:3330": {
"address": "localhost:3330",
"mode": "R/O",
"readReplicas": {},
"role": "HA",
"status": "ONLINE"
}
}
}
}

参考

Getting Started with InnoDB Cluster

好记性不如烂笔头,生命不息,学习不止!

分享